
Do you want to make multiple variations of your clothing in SineSpace? If so, then this clothing extra pattern system tutorial is for you. Creators have had a way to apply different colors and even PBR materials maps to clothing items since 2017. It’s a little bit of extra work to learn this step, but it will pay off in the long run.
PLEASE NOTE – this system has been replaced by the new Extra Pattern system. Click here to check out my tutorial on Extra Patterns.
This lets you create many variations from a single model, which makes shopping a little easier for customers. They pick an item, then see all your variations. It helps SineSpace make the grid run more efficiently. That’s important – they are building a grid that’s designed for hundreds (or even thousands) of users per region.
Prepare Your Master Item
To prepare your model, follow the steps on the SineSpace Clothing Tutorial, except this leave “Keep Material Always” unticked. See the picture below, the checkbox is circled in red.

When you click the Prepare (or Re-Prepare) button you will see the albedo map gets removed as pictured below. This prepares it as a master item, which will then get paired with all your patterns.
Now submit your item as you would normally (follow the steps in that tutorial if you need to). You will get an item ID immediately, which you will use in the next step. I want to take a moment to point out that when you are submitting an item for the first time, it is important to let it finish processing before you submit any patterns. Wait until you get an email or it shows a ‘staging’ status on the Curator Items Page.

appears at the top of the Virtual Good component
Create Your Extra Patterns
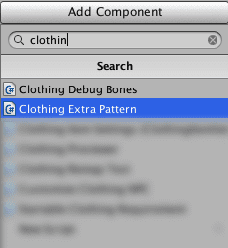
Start by creating an empty game object in your project. Select it, and then in the Inspector Panel click on the Add Component button and add a Clothing Extra Pattern component to it.
In the Extra Pattern component, look for the Parent Clothing Item section. Enter the Item ID from your master item into the Item ID field here. That tells the SineSpace servers which item to apply these patterns to. In the image below, I’ve blurred out the Item ID.
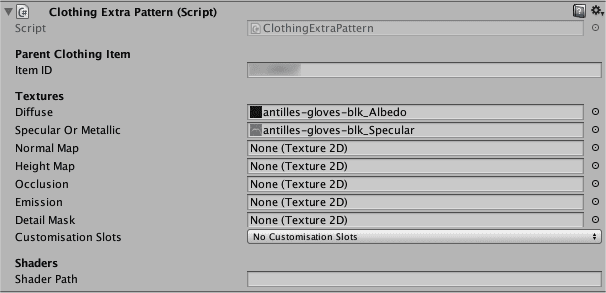
Next, select or drag in the maps for the textures that change from one version to the next. For example, if all your different versions make use of the same normal or height maps, you do not need to put them into the Extra Pattern component, they will get that information from the master pattern. If a map does change from one version to the next (a leather boot versus a metallic one, for example), then select or drag in the maps that are specific to that version.
Shader path – (do not touch this setting)
Add Your Virtual Good Component
It is worth mentioning that clothing variations will inherit the Product Name, Description, and Price from the Parent Clothing Item. You can do one of two things. Either add the component and re-enter everything, or copy and paste the component and just change what you need to. This will save you a lot of time, but you need to be careful!

To copy a component in Unity, go to the Virtual Good Component on your master item. Look for the little gear icon at the upper right corner. Click and choose Copy Component.

Now go to your Extra Pattern item. In the section above the Add Component button (in this case, Clothing Extra Pattern), click on the gear icon. Choose Paste Component As New from the list. That adds the component, as well as brings over all the settings you previously entered.

This part is super important. Make sure to clear out the Resume ID. You do that in the extra pattern by clicking the Clear ID button at the top of the Virtual Good component (see the picture above). If you don’t, uploading the new thing will wipe out the existing thing. Once you’ve cleared the Resume ID, just change the fields for Product Name (this must be unique), Store Icon and Inventory Icon.
Save your Extra Pattern Item as a prefab by dragging it from the Scene Hierarchy into your Project folder (just like you did when making clothing before), and then you upload the saved prefab.
Additional Variations Gets Easier
If you’re making multiple variations you can duplicate the saved prefab in your project folder (⌘+D on Mac, ctrl+D on PC). If you do that, make sure to clear out the Resume ID’s on those too.
After you’ve uploaded the items and they finish processing, you can log into the preview server to check them out. Take special care not to make sure they look right on your avatar as you normally would. Then take extra care your icons look good in the Outfit panel, and your item looks good in the Shop. You and your customers need to be able to tell one version from the other. The extra time you spend making your Store and Inventory icons look good will pay off here.

Limitations
The Clothing Extra Pattern system does have a few limitations. As the name suggests, it only works on clothing items. Additionally, it can only be used to change a single material. If your item uses multiple materials, design it so the material you need to change is in the first slot. Also, while you can change the textures in the material, you can not change out which shader is being used.
There is a new Pattern System coming in Editor Pack 14. It will support more than just clothing (furniture and cars, for example), and multiple materials. Once we get stable versions of Editor Pack 14 and SineSpace clients that support it, I will get a tutorial on that new system together.
That’s It!
Does this tutorial remind you of the extra patterns guide on the SineSpace wiki? It should – I wrote it! In the early days of the beta, I learned from and contributed to a number of wiki pages. As their doc team works on refreshing their site, I felt like I should be posting my stuff here instead (like my Boots & Heels guide or clickable teleporter tutorial). I’m excited to see what they come up with, and didn’t want to be sad or hurt if they wanted to replace some of my content.
If you have questions or comments, please post in the comments below! If you want personal help or private training, please see this post. Good luck with your projects!