
This tutorial will show you the process of making a clickable teleporter. That way, visitors can transport to another region in SineSpace with the click of a button.
Select An Object
First, in the Unity Editor you need to select an object to add the functionality to. This can either be an object in a scene, or an object that will be uploaded as furniture. The example shows a simple sign that has been created as furniture.

Add The Scripting Runtime Component

The next part of making a teleporter involves adding the runtime component. After selecting the object, in the Inspector panel click on the Add Component button and start typing ‘Scripting Runtime’ – as you type, you will see search results and can click once you see it.
Enter The Script
Copy and Paste in the code below into the Scripting Runtime component:
regionID = 15
coordinates = Vector.New(0,100,0)
rotation = Quaternion.Euler(0,15,0)

function activate()
    Space.Scene.PlayerAvatar.Teleport(regionID, coordinates, rotation)
end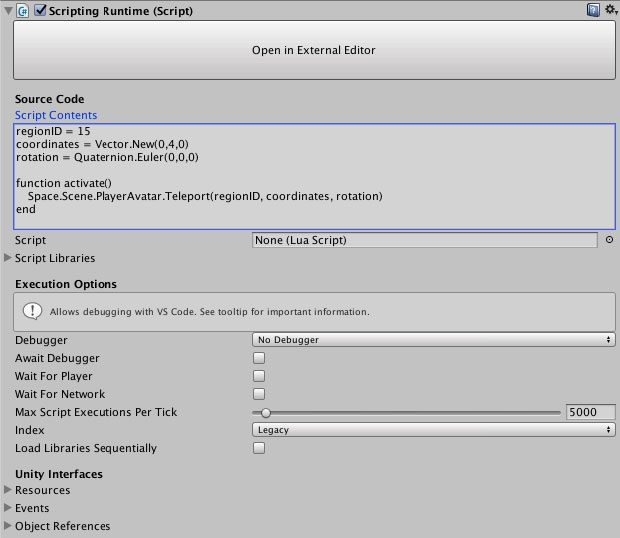
After you’ve pasted in the text, replace the regionID in the top line with your destination’s regionID. If the destination is your build, you can find the region ID on the Curator site’s Items page, on the listing for that region. If the destination is someone else’s build, you will need to talk to the region owner to get their permission and the region ID (as well as the coordinates below).
The coordinates and rotation values (lines 2 and 3 of the above script) is where you want the avatar to arrive in your region. If you are not sure what to use, enter the transform coordinates from your region’s main landmark.

Once you’ve entered the coordinates, change the dropdown setting for Index to Legacy.
Add The Clickable Activator Component

Now that the script is ready, you add a Clickable Activator to call it. Click the Add Component button and start typing ‘clickable’ and you should see it appear in the search results.
To configure the component, first you need to drag your GameObject from the scene hierarchy into the Object slot. Once you do that, you will be able to set the rest of the On Click Event () section up as pictured below. Enter whatever you like in the Tooltip section, this will display to users when they hover over your object in-world.

Upload And Test In-World
Finish and upload your region or furniture item and test it on the preview grid. The clickable object should highlight when you hover your pointer over it, and then clicking should transport you to your destination.

Once you have tested and confirm that it’s working, you can submit it for review from the the Curator site’s Items page.
That’s It!
Does this tutorial remind you of the clickable teleporters page on the SineSpace wiki? It should – I wrote it! In the early days of the beta, I learned from and contributed to a number of wiki pages. As their doc team works on refreshing their site, I felt like I should be posting my stuff here instead (like my Boots & Heels guide). I’m excited to see what they come up with, and didn’t want to be sad or hurt if they wanted to replace some of my content.
If you have questions or comments, please post in the comments below! If you want personal help or private training, please see this post. Good luck with your projects!
Pingback: SineSpace Clothing Extra Pattern System Tutorial - trilo.org