

In this tutorial, I show SineSpace content creators how to use the new Extra Pattern System. This way, they can easily add color and design variations to make it easier for customers to shop. It will also reduce jamming up the shop with nearly identical listings.
Extra Pattern For Extra Efficient Listings
The shopping experience should be all about efficiency. The SineSpace shop is designed to reward creators who use the Extra Pattern system. Use the system to your advantage and you will give your customers a better shopping experience while also increasing your rankings and sales.
Let’s talk about how the rewards, shall we? As far as the shop is concerned, SineSpace counts sales at the main listing level. So if you put out the same t-shirt model with three different colors or design patterns as three separate listings, then each one has its own separate sales count. Sell 10 of each shirt, you have three listings with sales of 10 units each. If you made one master listing and set up your colors and designs as patterns, then the sales are combined. Sell 10 of each shirt, you have 30 sales on that listing.

Garbage listings are at the bottom of many SineSpace shop categories. Creators who didn’t know better and subsequently ignored the pattern system. Others who thought they could gain an advantage by flooding the market. As a result there are many different listings for products that use the same model (as pictured above). They tend not to perform well, and eventually they sink to the bottom of the category.
Better Listings Get Better Results

The top of a category will often show a lot of listings for items that have Extra Pattern support. That is currently the case when it comes to most wearables. Clothing has had pattern support since early 2017, other categories only got it recently. Now that we have the new improved Extra Pattern system, creators can use it in most product categories.

Extra Pattern For Extra Efficient Loading
The extra pattern system makes things work more efficiently for users. Since the extra pattern items are all connected to the same master item, when a user changes their furniture or clothes to the other pattern, the SineSpace client doesn’t need to re-download the model (or models, in the case of LOD items). It’s intelligent enough to know that it only needs to apply the other material set to the model(s). It happens automatically and is under the hood, so your users and customers don’t have to do anything.
Extra Pattern: Getting Started
Let me start by pointing out that the new Extra Pattern system replaces the old Clothing Extra Pattern system. The word Clothing was removed to reflect that it now works with all types of items, not just wearables. More than that, the functionality has changed, and as a result it’s a more powerful component.
The old system was limited to clothing. It also did not allow you to change shaders. And was also limited to changing out a single material. The new system has none of those limitations. It’s easy to use, let me walk you through it.

On wearable items that use the SineSpace Clothing Item Settings Component, you need to make sure that the Keep Materials Always option is unchecked when you set up your item (see the image below). If you’re not making wearables, skip ahead to the Patternable Component section.

After you have clicked the Convert To Skinned button, you’re ready to move on to the Patternable Component section below.
Add The Patternable Component
Adding the component is easy. If you are making a simple item, you just add the component and then go. Select your item in the Scene Hierarchy. Click on Add Component, and start typing out pattern… It will come right up after you enter a few letters (see below).
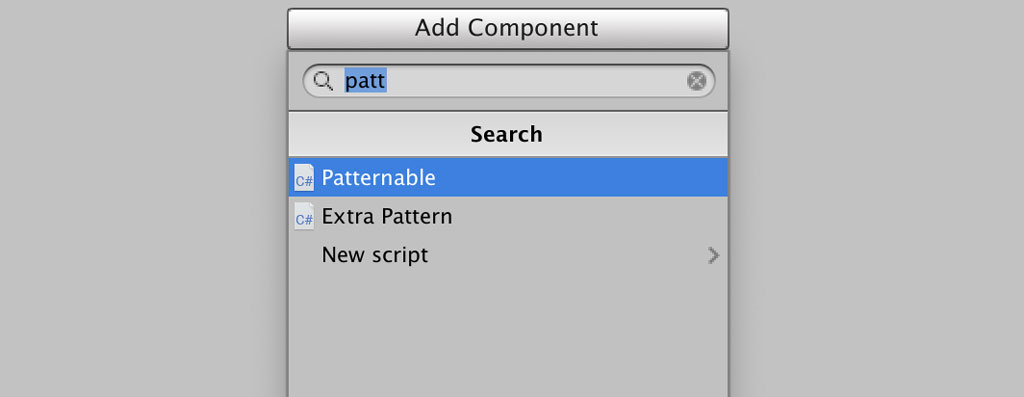
Now you should see a Patternable component on your item. It will have a randomly generated alphanumeric ID in a text field. This acts as a unique serial number (it’s blurred out in the image below). It’s created at the time you add the component and it should be unique. You can use that as is or click the New button to generate a new one if you like.

Additional Steps For LOD Models
If you are making an LOD item, there are a couple additional steps. An LOD item uses multiple models at different levels of detail to give users and customers a much better in-world experience. I’ll cover LOD items in another post in the near future.
In a nutshell, you need to make sure that each of your models has the same Patternable ID (or serial) number. The easiest way to do that is to add the component to your first model as shown above. Then copy and paste the component to your other models. That ensures that they all use the same ID.

Top copy a component in the Unity Inspector panel, click on the small gear icon at the top right. I circled it in the image above. That opens up a menu, and you can select Copy Component from the list.

To paste the copied component, select the next model in your LOD set in the Scene Hierarchy, and then click on the gear icon on the component above where you see the material. In my example above, that’s a component called Skinned Mesh Renderer. Click the gear, then choose Paste Component As New.

You should now see the copy of your Patternable Component in the Inspector panel. It should have the same ID from the other model. Repeat the process for any other LOD models in your item. Once you’ve done that, you’re ready to add your Virtual Good component and upload your master.
Upload Your Master
This part is even easier. After you’ve added your Virtual Good component and filled out the form (filling in as much detail so your listing doesn’t look generic), just upload your item.

In Unity 2018.3 and above, the way to upload your item is to select it in your Project folder, right click on it and then choose Upload to Sinespace from the menu. It will take a few moments, and then Mac users will be prompted on whether they want to use the Old or New Uploader (if you’ve followed my tutorial you want to use the New Uploader). That’s it, Unity will upload it to the SineSpace servers for processing.
Pro tip: if this is the first time you are uploading a new item, definitely make sure to wait for processing to finish. Over the years I have discovered that if you rush and try to upload patterns before the master has finished processing, there can be issues with patterns displaying properly. If that happens you will likely need to file a support ticket, which is both time-consuming and an unnecessary hassle.
Once the Master is uploaded and processed, you’re ready to move on to the Extra Pattern Component section.
Extra Pattern Component
Once you’ve set up the basics, the Extra Pattern component is where the magic happens. Start by creating an Empty game object, you can do that by right-clicking the Scene Hierarchy and choosing Create Empty from the list.

Make sure the item’s position and rotation are set to 0, and the scale is set to 1. Now add the Extra Pattern component. Select your item in the Scene Hierarchy, click on Add Component, and start typing out pattern… it will come right up after you enter a few letters (see below).

Once you’ve added the component, you need to add the Item ID from your Master Item. You can find that either on your Curator page or in the header of your Virtual Good component after you’ve uploaded the Master item. I’ve blurred out the Item ID in my example below, but you should get the idea.

Skip To The Middle
Next, skip that middle part with the Textures and slots for individual maps. That’s left over from how the component used to work when it was clothing-only, and I imagine they left the info there so it would not break existing content.
In the section marked Layers, change Size from 0 to 1 if your item uses a single material. If your item uses multiple materials that will change, then adjust that value accordingly. Next, in the Element section, you where I have marked with a red rectangle above, you want to copy and then paste in the unique ID from your Patternable component. Don’t try to manually type it, go to the component, select it and hit ⌘C on Mac or Ctrl-C on PC and then paste it into the ID field using ⌘V on Mac or Ctrl-V on PC.
Pro tip: it is a very good habit to use as few materials as possible in your items. Each material slot you use increases the number of draw calls per frame that it takes for all users to render your item. Using four materials means 4x the number of draw calls to render the item. Every single frame, for all users in the area where the item is in world. On modern desktop computers this isn’t really a problem anymore. For users on older PC’s, mobile devices, or using the web it can significantly increase the amount of lag in a scene. Most people want higher frame rates (or more FPS). Reducing the number of draw calls is one of the ways SineSpace creators can help with that.
Just Add Pattern

After you’ve pasted in the ID, click on the little circle to the right of the Material field. The picture above should give you an idea. Clicking the circle brings up a dialog box where you can start typing in the name of your material. Find and select your material. Once selected, it fills in the material field on the component. If you need help with materials in Unity, check the manual or do a web search as there should be plenty of great tutorials out there.
If you re using multiple materials, then repeat the process for each material you’re changing, making sure that the Material Index field matches the Material slot on your item.
Set Up The Virtual Good Component For Your Extra Pattern
The Virtual Good component can be super tedious to fill out. Using copy and paste, you can get through it in no time. However, you need to be very careful to make sure you don’t accidentally re-use the same item ID.
By now you should be familiar with copying and pasting components in Unity. Go to your Master Item and use the gear icon to Copy Component on the Virtual Good component. Now go to your new Extra Pattern and use the gear icon to Paste Component As New to add it to your Extra Pattern. If you’ve done it properly, you’ll see some error messages like in my image below.

Everything Is Normal
These errors are easy to fix. This method saves a lot of time over filling out a new form from scratch. This first step is crucial – CLICK THE CLEAR ID BUTTON in the header. That tells SineSpace that you are not updating your item (in this case, the Master Item). You are creating something new. Once you ciick that Clear ID button your header should look like the image below.

Avoid clicking that handy-looking ‘Fix Now’ button, as I’ve found that it does not always work properly. In my experience, it regularly un-fixes and causes headaches, so you’re better off ignoring it. Click on the drop-down menu for Type and choose Pattern from the list.
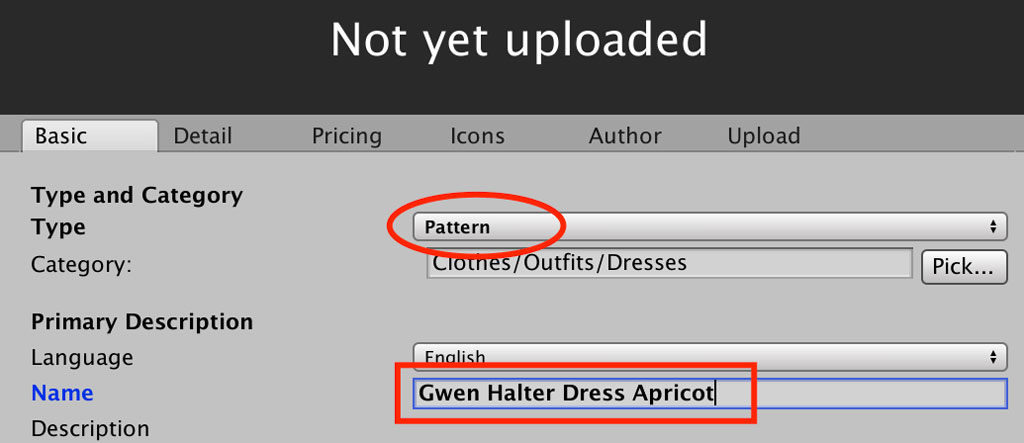
Notice that once you’ve changed the Type to Pattern, those red stop-sign errors are all gone. Good job, you’re almost there. Next, you need to tweak the item’s name to make it unique. In my example above, I added the color name.

Finally, you need to click on the Icon tab and then change the Item Store Icon and Item Inventory Icon images. As the names suggest, these are the images that users see in the SineSpace Shop, and in their inventory windows (as well as the wardrobe screen, in the case of clothing and wearables).
Note: As of this morning, SineSpace has announced that creators can now use 1024×1024 images for their Store Icons – so despite what my screen shot shows, use that resolution for your Store Icon and Extra Preview images.
Upload Your Extra Pattern
At this point, save your Extra Pattern prefab to your Project folder. Just like with any other item, simply drag it to the Project folder. Then just like we did with the Master, right click on it and choose Upload to Sinespace from the menu.
Rinse and repeat the process for each color and design variation you have. Once the pattern has finished processing, then you can hop in-world on the preview grid to test your item out.
Specific things I recommend checking is to make sure your Inventory Icons are easy to tell apart. Depending on your product or the image that you’re using, it can be difficult to tell one color apart from the next. Try to imagine your ideal customer – someone who has bought every version. Make sure it’s easy for them to tell one from the other.
That’s It!
You should now be able to use the Extra Pattern system for your items. Refer back to the tutorial when you need to, but soon you’ll be making variations on your materials and designs like a pro.
I assume that you already are familiar with the basics. If you’re brand new to SineSpace and need help with the basics, check out this tutorial or check out these installation videos. The article will help you install and set up the Unity Editor to prepare and upload your creations to SineSpace. Similarly, if you haven’t already discovered it, this post will tell you all about the Unity Hub to manage your installations. This tutorial will help you with creating clothing. Check the SineSpace Youtube channel for tutorials, and you can also watch this space for more tutorials in the future!
Do you have questions or comments? Please post in the comments below. If you want personal help or private training, please see this post. Good luck with your projects!
Latest Tutorials
- Using Adobe FireFly On Vision Pro
- What Is Physically Based Rendering?
- Copy And Paste On Vision Pro
- Allegro BTS
- How To Use The Extra Pattern System

Pingback: Allegro BTS - A Peek At The Gown from BlakOpal Designs- trilo.org