
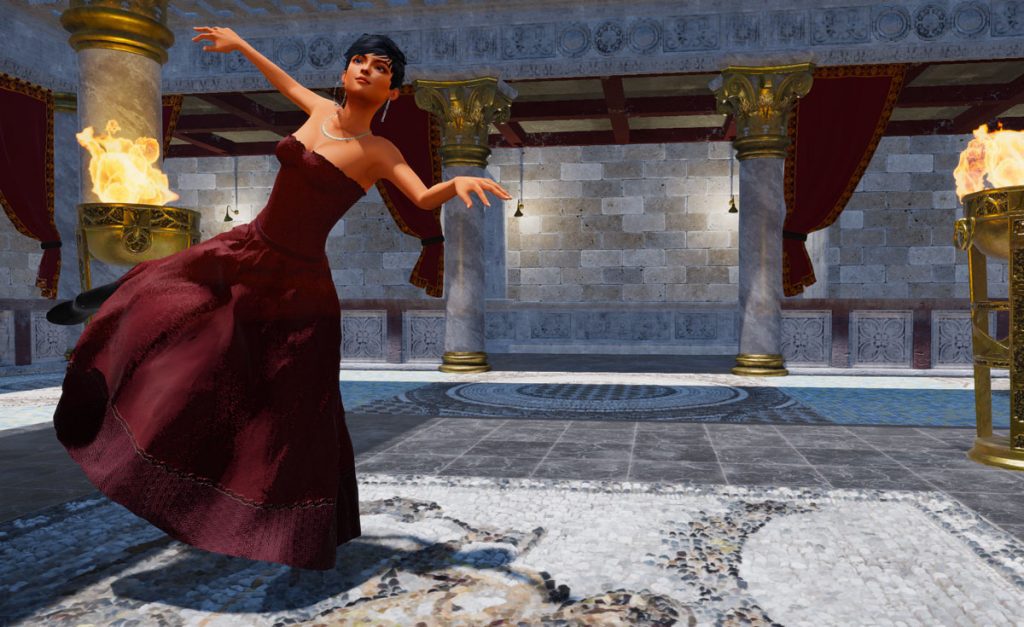
With this special Allegro BTS post, I would like to take you behind the scenes. I want to show you how we made our groundbreaking Allegro Gown in SineSpace. This is the first long gown with working cloth physics in SineSpace, or any virtual world for that matter. Check out the video below to see the Allegro in motion.
Starting At The Beginning
We started this piece several years ago. At the time, neither BlakOpal nor I gave any thought to documenting the process. I will open the files in current versions of the software to give you a glimpse of the process.
Shortly after we got cloth physics to work on the Bettie Mini Skirt, we started making a wish list. What else could we make using cloth physics technology? We got excited about everything. From pirate coats to dresses, and especially on longer dresses. The flow of the fabric makes events like balls and dances even more magical and fun.
Before I could dive into the technical artist side, BlakOpal needed to come up with a dress design. Making a dress (or any other clothing) for SineSpace is pretty easy for a 3D artist. You start by getting the male or female avatar. It’s included in the SineSpace Editor Pack (this tutorial shows you how to install that). Simply make a copy of the avatar model and import it into whatever 3D modeling program you use.
Weapons Of Choice
BlakOpal and I have been making real-world and virtual world art together for nearly fifteen years. Individually we have been working as artists for a lot longer than that. For general purpose 3D modeling work, Cinema 4D from Maxon is her go-to program.
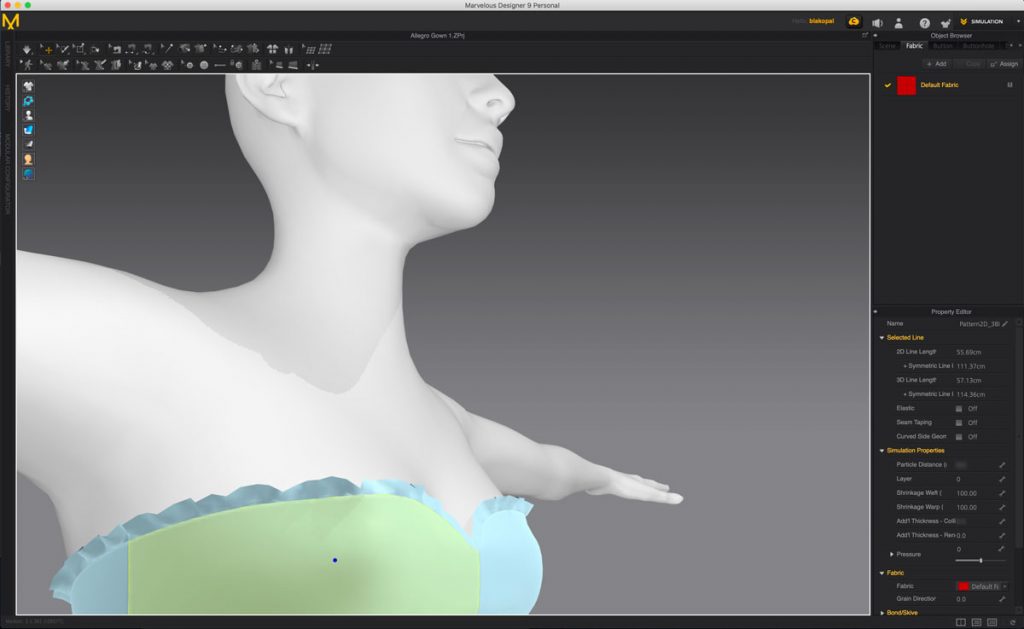
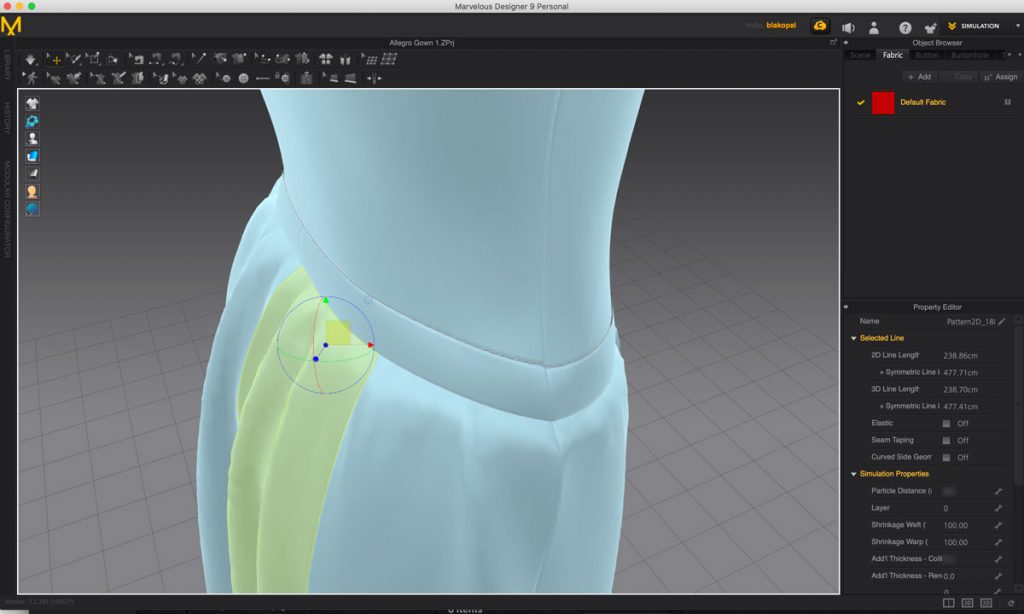
When it comes to clothing, we frequently use other tools. For nearly ten years we’ve been big fans of Marvelous Designer from CLO. Before we started making pirate coats in virtual worlds, we were making pirate coats in the real world. The way Marvelous Designer works like pattern-making software makes a lot of sense to us. In this Allegro BTS I’ve opened up the gown in Marvelous Designer and selected some of the individual pieces.
After creating the design in Marvelous Designer specifically for the SineSpace avatar, we exported it and then brought that into Cinema 4D. This lets us clean up the model to reduce unneeded polygons, as well as work on the UV mapping.
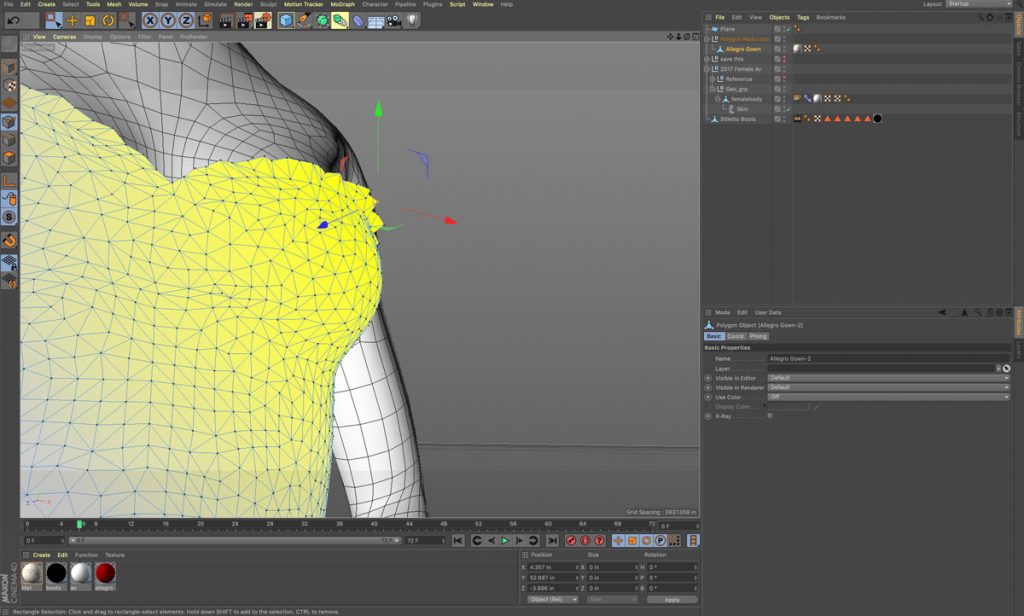

When we created the original dress model, neither Marvelous Designer nor C4D had great UV mapping tools. A lot has improved in three years, and today I’m happy to report that it’s a lot easier to create and edit UV maps for 3D models.
Learn To Use Your Tools
Whatever you use, it is well worth your time to get familiar with that program. Scour the web and Youtube for tutorials, and look at cheap or free training you can get to teach you the basics. As I hope the Allegro BTS illustrates, tinkering and tweaking the design is essential to get something that you’ll be happy with.
Allegro BTS: The Case For Efficiency
Once we had the first version of the model ready to go, it was time to export it from our modeling software and bring it into Unity. It was still the very very early days of the SineSpace beta, and a lot of our process turned out to be great exercises to help Sine Wave CTO Adam Frisby develop some of the tools for content creators.
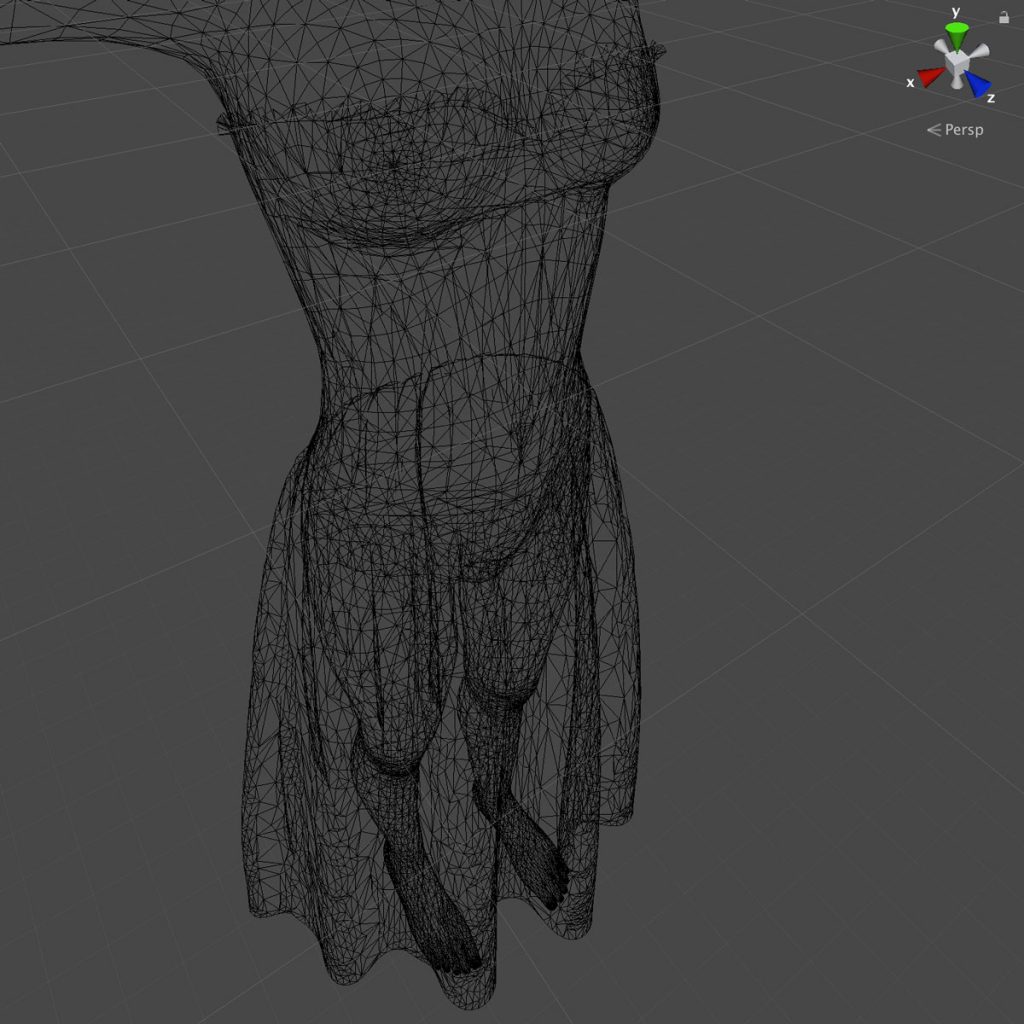
We had already spent time in Cinema 4D to reduce the original design to a little more than 60K polygons. That is a massive amount for a dress for use in a game engine, but we wanted to see whether SineSpace could even handle it. We also wanted to better understand the pain points.
The lack of efficiency was definitely painful. We worked with Adam to develop LOD support, but for a lot of other reasons we wanted to get those numbers as low as possible. The logic is simple – more polygons means the computer or device has to do more work to render it. Especially in motion. A powerful desktop or laptop machine may not have any trouble, but for users on low end machines, phones, or in web browsers the unnecessary geometry just causes lag.
Levels Of Detail
Once SineSpace had LOD support (thanks, Adam!) we had a shot at making this work and being a great experience for all users. We could make different models with varying levels of detail, and SineSpace makes sure that users get the best one for their device and connection.
Is it better to start with a simple design and add detail after? Or start with something highly detailed and simplify through refinement? I don’t think there’s a wrong answer – use what works best for you. For us, in this case, I wanted BlakOpal to start with as much detail as possible, and I would refine it for efficiency.

I have and use a lot of different tools to help me with reducing polygons (also known as decimation in some apps). First and foremost, check your modeling app of choice. C4D used to have terrible tools, but these days it does an admirable job.
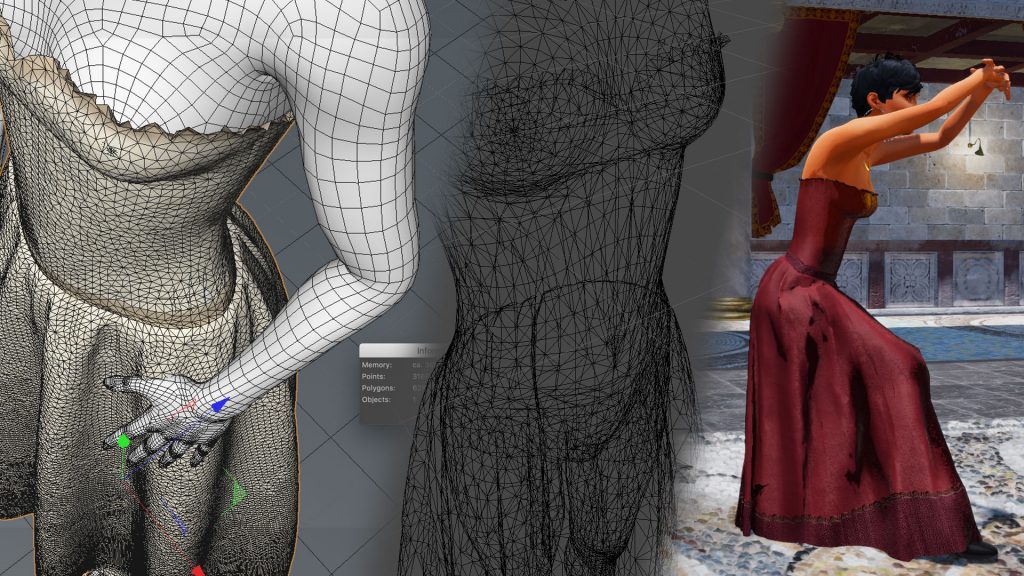
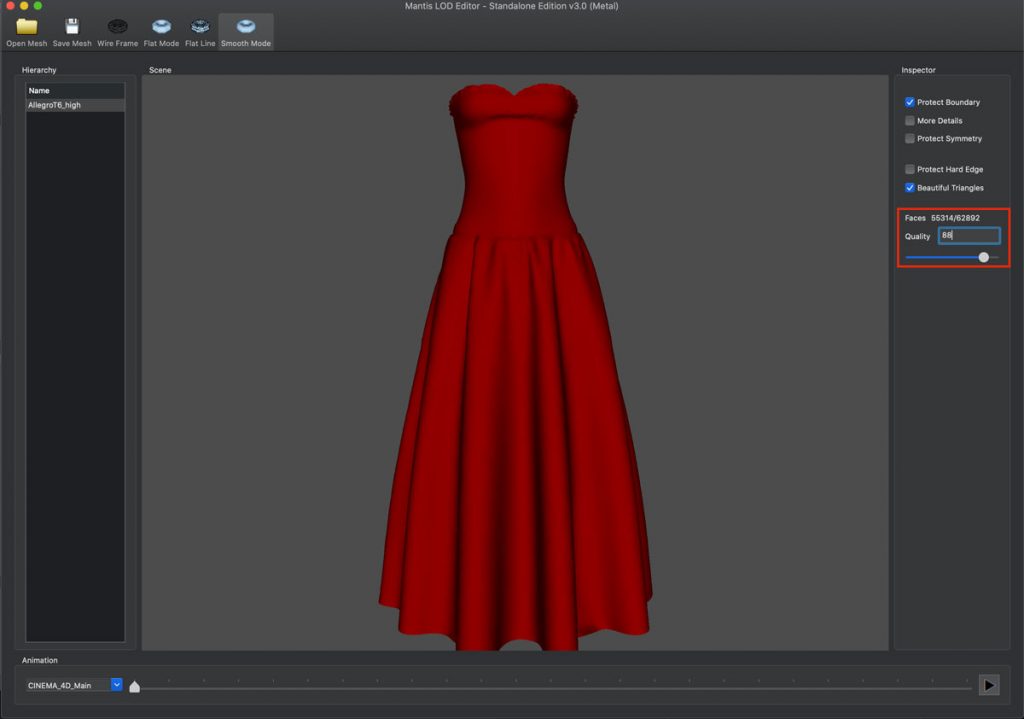
There is a third party cloud service out there called Simplygon, but I do not recommend them. Even before they were acquired by Microsoft in 2017, their terms and conditions gave us pause and we simply were not comfortable doing business with them. Unity has options, too. I’ve used Simple LOD, Automatic LOD, and Mantis LOD Professional Edition (they also have a Standard Edition). Mantis Pro also comes with standalone apps for Windows and Mac, which is why I went directly for that. Check out the pics above to see the Allegro Gown in Mantis Pro, it’s easy to use and super stable (Automatic LOD has some great additional features, but is more prone to crashing).
Living In A Material World
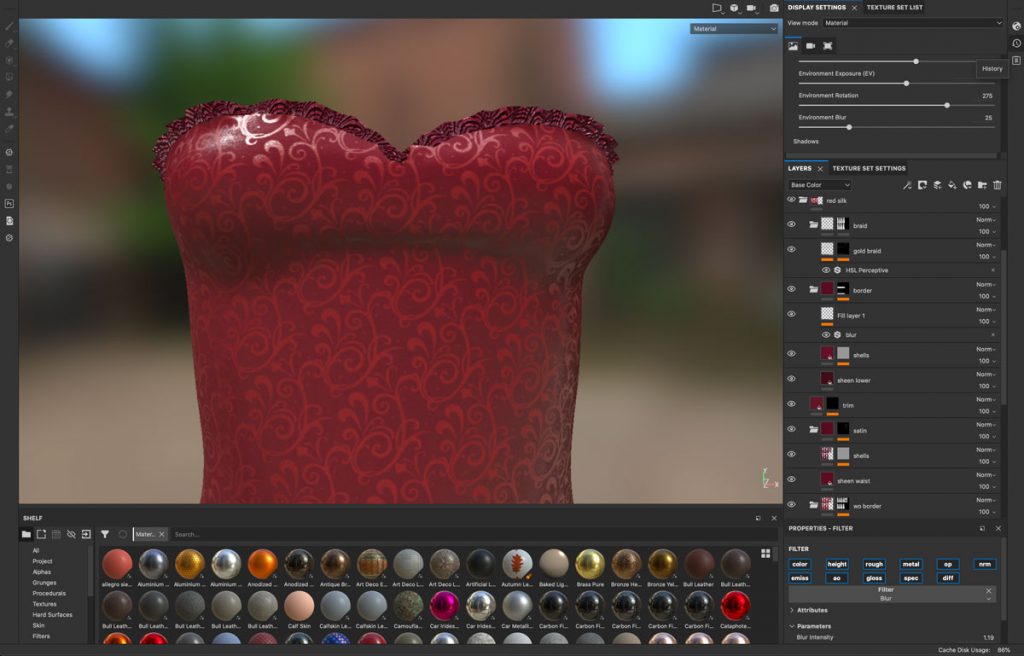
On this Allegro BTS post, I want to take a moment to sing the praises of the Substance ecosystem. Originally created by a company called Allegorithmic, they were acquired by Adobe in early 2019. The Substance suite of tools is one of the newer weapons in our arsenal, but BlakOpal and I really love the software. We both have been users of Photoshop since the early days (and continue to use Adobe‘s tools), and we find the Substance workflow to make a lot of sense for us. That and hats off to the Substance team for some really great documentation and training. It helped us get up to speed on PBR materials quickly, and we still make use of it regularly for refreshers and to learn about new features.
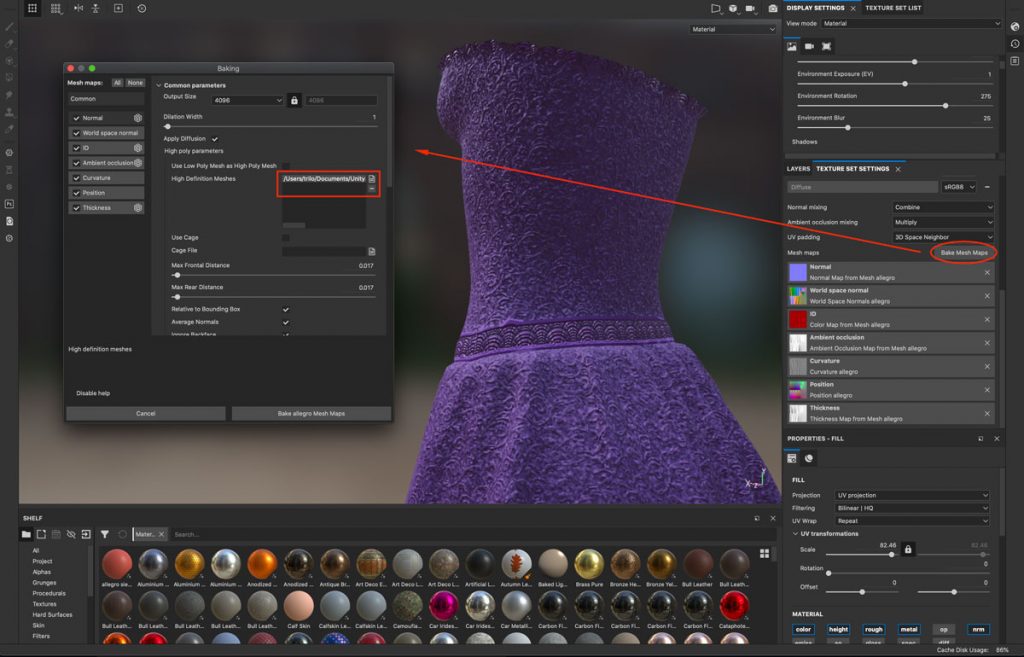
In the Allegro BTS shot above, you can see where I’ve popped open the window in Substance Painter to allow me to bake mesh maps using the higher quality version of the model that I started with. Beyond that, though, it lets us easily integrate brocades and patterns we created in Illustrator and Photoshop.
There are a variety of tools out there that you can use for painting textures and creating the various materials maps. Just like with modeling software, there is no wrong answer as much as it’s a matter of finding out what’s right for you and your budget. I used to use Filter Forge Professional for authoring and rendering materials, and it’s still a great program, but as we’ve grown on our creative journey, our workflow has evolved.
Hooray For 4K
Since we started the piece, SineSpace has added support for 4K Materials. Fortunately for us, BlakOpal and I typically work in much higher resolution than we need to. It didn’t take much work for us to give the Allegro Gown 4K materials.
Allegro BTS: Back To Unity
After we had the models and materials ready it was time to head back to the Unity Editor. Assembling and preparing the piece took a little work, but as you get familiar with the SineSpace workflow it quickly becomes second nature.
Here are the quick steps to get started. I will assume that you have already checked out my clothing tutorial. In a new scene, add the SineSpace avatar and then create a new, empty GameObject. Reset the position to 0,0,0. Name your GameObject, and add your LOD models as children of your empty GameObject. Take a moment here to make sure that LOD0 (the highest quality model) is the first one in your hierarchy, followed by LOD1, and then LOD2. SineSpace’s component may misbehave if you have them in a different order.
Connecting The Dots
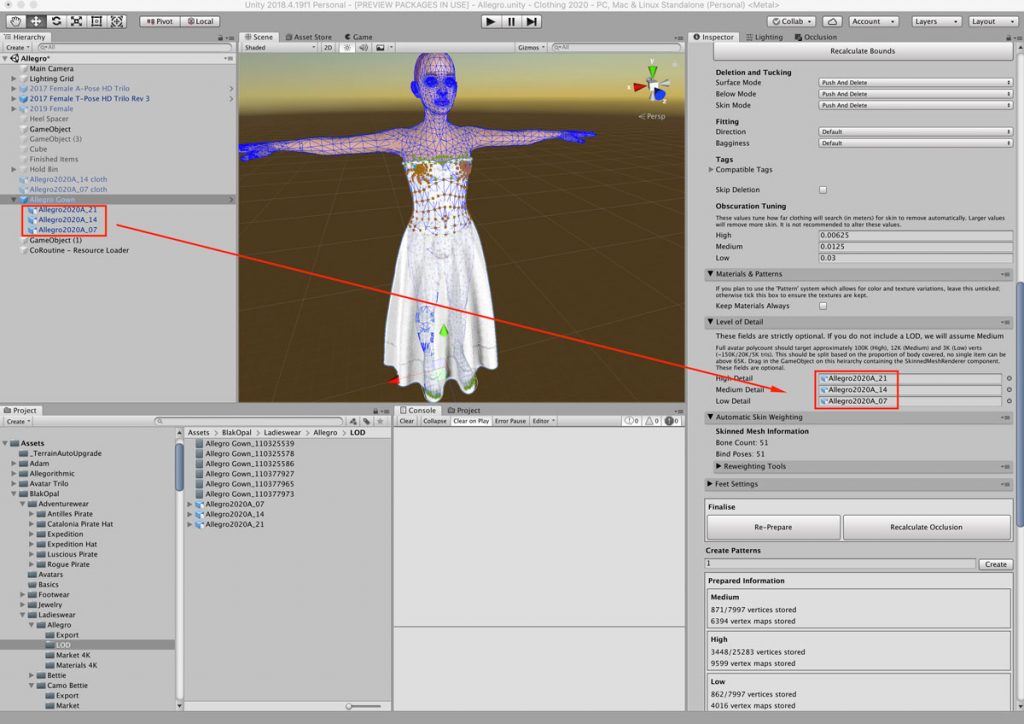
Next, select the empty GameObject in your Scene Hierarchy and add the Clothing Item Settings component. Twirl open the Item -> Clothing -> Level Of Detail component. Now drag your LOD models from the hierarchy over to the empty slots (see how I’ve done it in the picture below). This connects the dots, so to speak, so the Clothing Item Settings component can use your models.
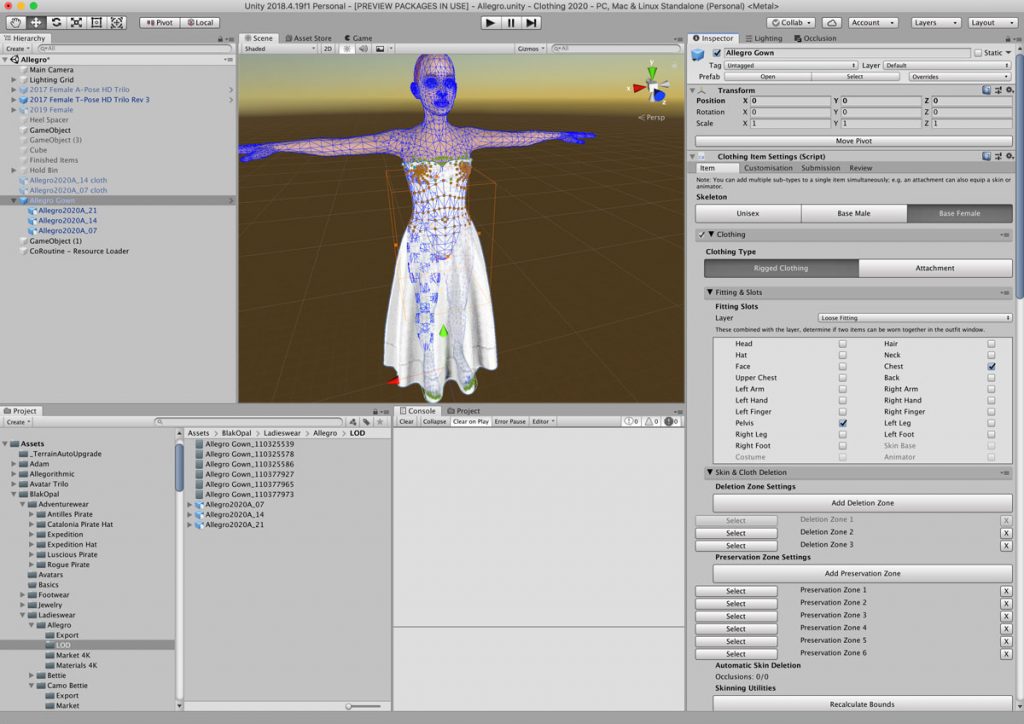
After that you fill out the form normally (refer to that clothing tutorial if it’s not familiar), and Convert To Skinned. Once the piece has been skinned, you should add your Preservation Zones and Deletion Zones. That helps SineSpace fine-tune the fit when users put the piece on. The image below gives you an idea of what that looks like.
After the item has been skinned is also when we set up the Patternable component to the individual models. This is a necessary step if you are planning on using the Extra Pattern system like we were. You can click here for my tutorial on how that works.
Allegro BTS: Cloth Physics Is Mad Science
It is a little maddening that you need to get this far along in the process before you can start what may well be the most difficult part. Cloth physics. It sounds like it might be easy, but it does take a lot of work to get right. It can be extremely processor intensive, it’s not widely used by a lot of Unity games, and so there is very little in the way of useful documentation. There is also no magic button that you press to make it go.
BlakOpal and I were lucky. When we arrived in 2016, I already had years of experience working with physics systems on other 3D rendering projects. I also have a working knowledge of physics and complex system design. I will break the process down a bit below, but the best advice I can give is to try, try, try again. The settings are different for each different model. It can easily take dozens, and possibly even hundreds of tries to get things right.
Back To The Drawing Board
In this Allegro BTS piece, I can reveal that getting it right required 6-7 ground-up re-works of the model. Each one was then reworked to sets of LOD models, and set up with dozens and dozens of attempts on each to try and get the physics working. Dig in and prepare for the long haul.
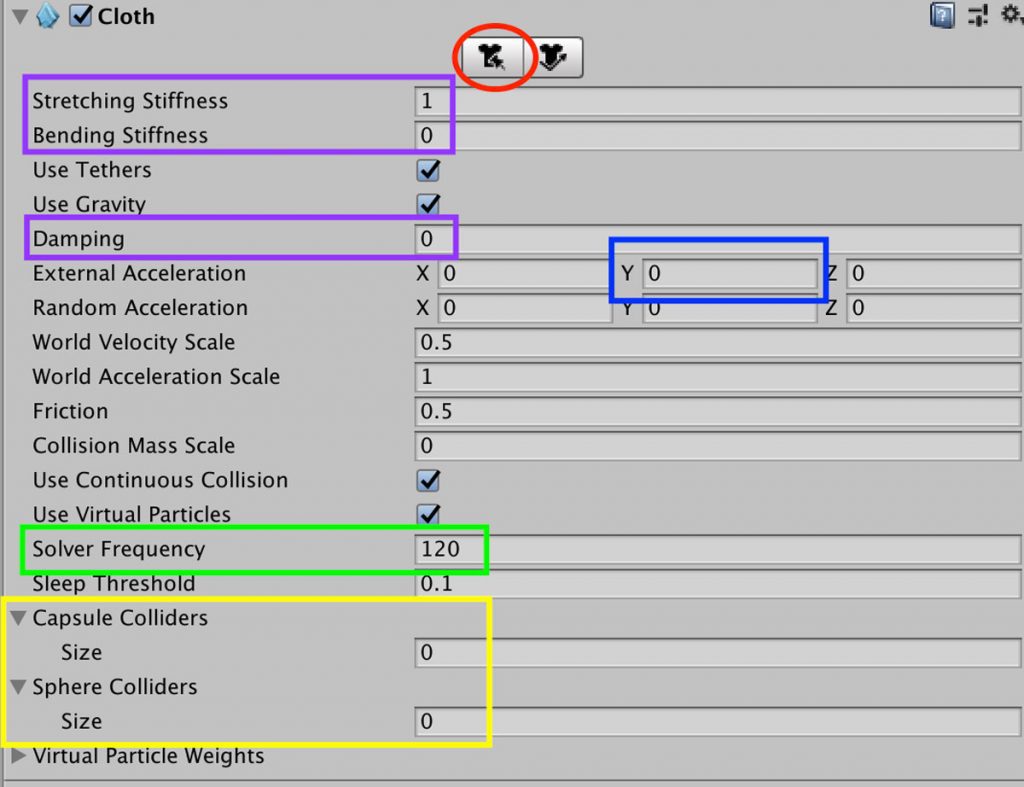
Add the Cloth component to your model after you’ve converted to skinned, and you’ll see something that looks like the image below. The red circled bit is for painting constraints, which I’ll cover in a bit. Let’s talk about those rectangles.
Lots To Tinker With
The purple rectangles are the simple basics – stretchiness, bendiness, and damping (how fast it stops moving). Stretching Stiffness of 1 is non-stretchy cloth, and reducing that value gives it a rubbery quality. BlakOpal and I do a lot of real-world clothing work, so we’ve got a solid understanding of the stretch that different fabrics and materials can have. If you’re struggling with this, go visit your local fabric store.
The blue box allows you to tinker with gravity. Unity typically has a base value baked into your preferences, and what you enter here lets you modify things as you need to. A negative value makes it heavier, and a positive value makes it lighter.
Solver frequency is essentially the refresh rate for cloth rendering. The important thing to remember here is that SineSpace has a built-in limiter. It gets applied when the item is processed on the server. The more vertices that your item has, the lower that the maximum solver frequency can be. Chances are if you’re changing this number and don’t see a difference in-world, you’re using too many vertices. The limiter is cutting you off. If your cloth doesn’t flow smoothly and you can’t fix it, you need to go back and re-work your model. Reduce the number of polygons and vertices and try again.
The Devil Is In The Details
The yellow rectangles are tedious but important – colliders. Cloth Physics is not yet capable of just using mesh colliders, especially on a moving mesh avatar. So you need to make do using capsule and sphere colliders. You add the colliders to your avatar model in the Scene Hierarchy. and once they’re in place you tell the form how many you’re using and drag the colliders into the slots on the form. I’ve been doing cloth physics in SineSpace longer than anybody, and from my experience every single piece is different. Tinker and test and try different setups. The first few pieces will be insanely hard, but eventually it gets a little easier.
A Game Of Constraint
This bit can be the most maddening, and here it is so close to the end. I hope it gives you a better sense (and appreciation) of how much effort goes into it. I don’t want to put creators off from using physics, but help you understand where the tricky parts are and how much time goes into it.
That red circled bit in the picture of the form way above brings up the little floater window shown in the window below. The trick here is to start by selecting the entire model, and setting a constraint of 0. That tells the piece to stay in place where it’s rigged to the avatar, with no movement. If you forget that step, the piece will fall off the avatar and go through the floor in-world.
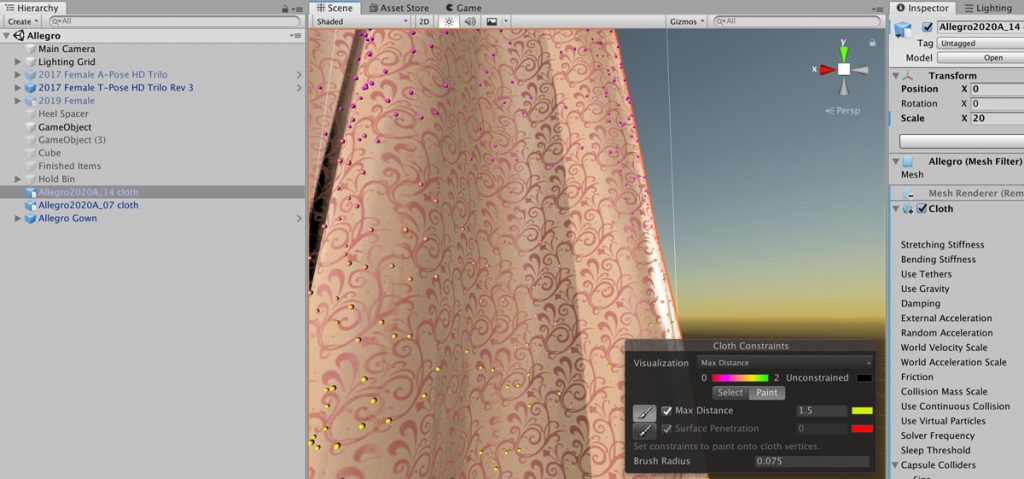
Now it’s simply a matter of selecting vertices and setting a Max Distance. This tells Unity how far the piece can move. You can also click the Paint tab and then choose the Max Distance. This allows you to hand paint which vertices should be at a specific value.
I would recommend starting out by using the selection tool. Set up a couple values – think of it as a rough draft, or using broad strokes. Give it a shot, see what happens. You’ll probably get some funny results, but you’ll learn by doing. Then go back and paint the constraints. Like I’ve said before, every piece is different and you will get best results fine-tuning your constraints by hand painting.
All Systems Are Go…Mostly
I’m pleased to report that all systems are go. Actually, that isn’t quite true. Most systems are go. SineSpace has tools to make it relatively easy for creators to bring their work into Unity and get it uploaded. They have working cloth physics that are compatible with the Unity 2017.2 engine. Soon we hope SineSpace will have cloth physics support that is compatible with Unity 2018.4LTS features. They have a great system to let creators offer multiple patterns and materials (check out my tutorial here).
Sine Wave designed a new set of avatars that will look and wear clothes better than ever. and hopefully creators will be able to use them. Improvements are also coming that will make the auto-rigger even more powerful and enable creators to get even better results. The customization system should also be finished and working soon. Creators will be able to let users adjust and fine-tune their wardrobe like never before.


That’s It
This Allegro BTS should give you a glimpse of how we made the piece. I hope it gives you a sense of appreciation for the work we put into it, and gives new SineSpace creators pointers and encouragement on how they can get started with cloth physics.
If you’re brand new to SineSpace and need help with the basics, check out this tutorial or check out these installation videos. The article will help you install and set up the Unity Editor to prepare and upload your creations to SineSpace. Similarly, if you haven’t already discovered it, this post will tell you all about the Unity Hub to manage your installations. This tutorial will help you with creating clothing. Check the SineSpace Youtube channel for tutorials, and you can also watch this space for additinal tutorials in the future!
Do you have questions or comments? Please post in the comments below. If you want personal help or private training, please see this post. Good luck with your projects!
Pingback: Apple Vision Pro - A New Era - trilo.org