In this post, I want to show you how to use post processing in SineSpace. It’s easily one of the best techniques you can use to improve the visuals of the regions (or scenes) you build for SineSpace in Unity.
Instead of showing you before and after photos, I want to show you the after photo first. The above image shows a workshop scene with just a few minutes spent on tweaking the effects and lighting. The shot below shows the same thing, just before.

Very light performance impact for most users
What’s even better, for users with a modern GPU or mobile device, post processing effects are relatively lightweight. Unlike baked lighting, post processing has no lightmaps or textures to download, and they don’t carry a huge performance penalty. Visitors on older hardware who may struggle with performance can easily turn off individual settings in their SineSpace client. Just click the cog icon at the bottom corner and untick the box to turn a feature off.
The first couple times you try to set it up will seem a little confusing. Once you get the hang of it you will probably wind up using this in all your region builds. If you already have Unity 2018.3.x and Editor Pack 14 installed, you’re ready to get started. If not, then check out my post on getting started in Unity and SineSpace.
Let’s Get Started
You can set up post processing at the very start of a new region project (when there’s nothing else in the scene), you can add it at the very end, or you can add it anywhere in between. For this example I am using a simple untextured terrain.
Add a Post Process Volume
Right-click on your Scene Hierarchy and choose 3D Object -> Post-process Volume from the context menu.

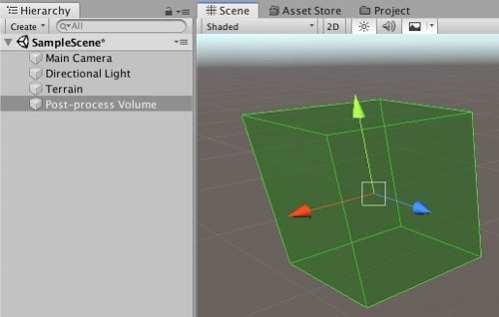
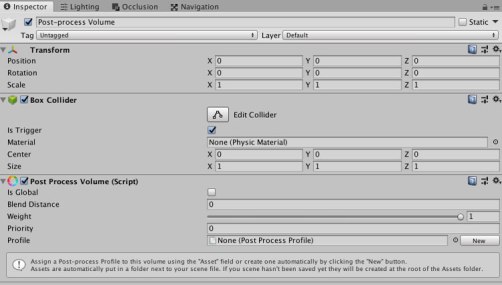
After you’ve added a Post-Process Volume, select it and then focus on it in the Scene view – you will see a green translucent cube. The image below that shows the Inspector Panel view.


In the upper right section of the Inspector Panel, change the Layer to TransparentFX.

Next, in the actual Post Process Volume component, you will want to tick the ‘Is Global’ checkbox. This tells Unity that these post processing effects will apply globally throughout the entire region.


Now you need to either drag in an existing Post Processing Profile (if you have one) from your project folder and drop it into the Profile field, or create a new one. The handy-dandy New button will create the file and add it for you.

created, or click the New button to create one.
Have Profile, Will Travel (Almost)
Once you have a profile in the scene, you are almost ready to go. If it’s a new Post Processing Profile, your list may be empty and you will need to click on the Add effect button. For this tutorial, I am using Vignette.

Even after you add Vignette, and then you tick the boxes at left and adjust the intensity (as I did in the image below), nothing appears to change in the Scene or Game views. That is perfectly normal, I said you were almost ready to go. It’s configured for the SineSpace servers, but if you want to be able to preview it in the Unity Editor, you need to configure the Main Camera.

To get that working, you need to do one more thing.
Configuring The Camera

Select the Main Camera in your Scene Hierarchy, and then back over in the Inspector Panel, click on the Add Component button.
Type the letters post into the search field, and then choose Post-process Layer from the search results.
In the Post Process Layer Component, you need to set the Layer to TransparentFX (the same layer you assigned your Post Process Volume to earlier).

Once you’ve done that, you should see the effect in both your Scene and Game views. You’ve gotten it working!

Everything above covers you for the basics. You add the volume to your scene and assign your profile, and then use the Layer on your camera so you can see it. At this point, feel free to add effects and play with settings until you find something that you want to use in your region builds.
Have fun, experiment with different choices. My advice here is that once you find something you like, copy the profile and make further changes to the copy. In no time you’ll come up with a number of different post processing choices that you can use in your scenes to take them to the next level.
Beyond The Basics
Everything above covers you for the basics. You add the volume to your scene and assign your profile, and then use the Layer on your camera so you can see it.
Of course, you can go beyond the basics. Instead of a single global Post-Process Volume, you can untick the ‘Is Global’ checkbox and create different areas or zones that use different Post Processing Profiles.

In your Post-Process Volume, there are three key areas to pay attention to. First, in the Box Collider component you’ll find controls for the size. As with any box collider, adjust the size using these controls (as opposed to changing the scale values in the Transform component). Second, the ‘Is Global’ checkbox needs to be unticked, otherwise the settings you specify in the Post Processing Profile will be applied across your entire SineSpace region. Third, the Blend distance affects the transition from no effect to the full effect of your profile.
It’s Tricky
There are a couple additional things to point out here. Post processing profiles are additive. For example, if you have a global Post Process Volume that adds a vignette effect to the edge of the screen, and then a non-global volume to adjust the exposure in only one specific area, then that specific area will have the vignette and the adjusted exposure.

effects relevant to your main camera’s position.
The non-global Post-Process Volumes are also slightly tricky when it comes to previewing in the Unity Editor. Since they only apply to a designated area, they will only show up in the editor window if the Main Camera is active and located within the area you specify.
Multiplicity
Allowing multiple Post-Process volumes in a region is new to Editor Pack 14, and opens the door to some really fun possibilities in SineSpace. You can have spooky lighting in a cave or the basement of a haunted house. You could do an alien planet landscape with an unusual atmosphere, yet have relatively normal lighting and post processing effects inside the spaceship.
Some of these features have been a long time coming, and I am excited to see not only what I can do with them, but what you and other SineSpace creators come up with to show this feature off. If you care to, leave a note in the comments with the name of a SineSpace region you’ve made (or even one you discovered) that’s doing something interesting with post-processing.
Baked In Goodness
For creators who used Post-Processing v1 in Editor Pack 13 and before, two sections appear to be missing. Anti-Aliasing and Volumetric Lighting previously had their own sections, but aren’t in Post-Processing v2. That’s because they are now baked in by default. All SineSpace regions will have anti-aliasing support, and users can turn that on/off in their client using the settings icon at the bottom left. Volumetric lighting still requires some additional setup to function, but that’s a separate tutorial topic to be covered at a later date. Stay tuned!
What About Camera Frustrum?
The first question that comes up when talking about camera frustrum is… what is it? The fine folks at wikipedia have a great article that goes into more detail than I ever could. Simply put, it describes the field of view.

Hooray for diagrams, but that makes it look more complicated than it is. Anything that is outside the field of view gets clipped, or simply isn’t drawn. Some programs may refer to the terms near clipping (or far clipping), and in Second Life it’s controlled completely in the user’s client with the Draw Distance setting in preferences. In Unity and SineSpace, you control over how that works in your scene.
If you aren’t having issues with stuff that’s either too close or too far away from the avatar in the scene getting cut off (because it’s outside the field of view), then the default values work for you and you can skip this section.
Get in the Zone
To change your SineSpace region’s camera frustrum settings, you have to use an older, legacy component called the Post Zone. To do that, add an empty GameObject to your scene. Click on the Add Component button, and start typing the word post – you’ll see it in the search results as in the screen shot below.

The next step is to simply clear the field. Go through and uncheck each section of the Post Zone. Theoretically, since all those settings have been replaced by something newer they should just be getting ignored, but better safe than sorry.

The picture above shows most of the Post Zone component, but not all of it. Make sure you scroll down the Inspector view and uncheck all the sections.
Going The Distance
The only part of this component that matters to us is the Frustrum Minimum (or near clipping plane) and the Frustrum Maximum (or far clipping plane). Adjust the values as you need to for your scene.

Remember though, these can potentially be sources of lag. You don’t want (or need) to crank the numbers just for the sake of cranking the numbers. The greater the distance to the frustrum maximum, the more things that the SineSpace client needs to render. Unity does offer a few tricks you can use to keep a big scene from getting laggy. For more reading, check out Occlusion Culling in the Unity manual.
Since this is an old legacy component, unfortunately you don’t get a live preview in the Unity Editor. You can set that up manually. Simply copy and paste your Frustrum Minimum and Frustrum Maximum values into the Main Camera Clipping Planes fields for Near and Far.

Near/Far Clipping Planes settings.
Now your Main Camera’s view will show you the same level of clipping that avatars should see in-world.
In the example below, raising the Frustrum Maximum value lets clouds of dust blow several thousand kilometers into the distance of the empty desert scenery.

That’s a Wrap!
Now you know everything you need in order to take your region’s visuals to the next level. Using these components, you can make a scene go from looking like this…

…to this!

If you have questions or comments or want to share the name of a SineSpace region that makes great use of post processing, please post in the comments below! If you want personal help or private training, please see this post. Good luck with your projects!


Pingback: Get Started with MicroSplat in SineSpace - trilo.org
Pingback: Tirana Rainbow Forest with Spectacular Rainbow Forest in SineSpace
Pingback: Izi Sig Volcano World in SineSpace by Trilo Byte Design
Pingback: Cyber Week 2019 SineSpace Deals and Freebies - trilo.org