

This quick and easy tutorial will show you how to create a water zone for SineSpace. Once you do this, users who go underwater in your regions will see awesome aquatic effects. It also enables you to create buoyant objects that float on the surface, and let users make use of boats and other functions. That stuff is outside the scope of this tutorial, I am just sticking to the basics of the water zone here.
I will assume that you have already gotten started with Unity and SineSpace. I have a tutorial on that coming soon, but in the meantime you can check the SineSpace wiki or Youtube channel. Beyond that, you need to create your region, with a terrain and some kind of water. Once you’ve done that, adding a water zone to your scene is super easy. Let’s dive in!
Load your region in the Unity Editor

Load up the scene for your SineSpace region. In my example, you can see an island with a large water plane.
Disable the Water and Take Notes
Select your water in the Scene Hierarchy, and in the Inspector Panel you want to untick the checkbox so that it is disabled (it’s the red circle at the upper right in the image). That will let you see your water zone component a little better. You should also take note of the height that your water is at (it’s the other red circle in the image below).

Next, select the terrain in your Scene Hierarchy, and click on the gear icon in the Inspector Panel. Scroll down until you see the section that displays your terrain width and length. Don’t change anything, you just need to know those numbers. In my example, the terrain is 2000 meters x 2000 meters.

Add an empty GameObject
Make sure you’re not selecting anything in your Scene Hierarchy, and then click on the GameObject menu and choose Create Empty. In my scene, I set everything to be centered at x/y/z coordinates of 0/0/0. You should set yours to the center of the scene.

Creating the Water Zone component

After selecting your empty GameObject, head over to the Inspector Panel. You want to keep your scene from getting cluttered with a bunch of items called GameObject. Change the name of this one now to something that makes it easy for you to find later. In my example I used “Water Zone” you can see it circled in red.
Configure your Water Zone
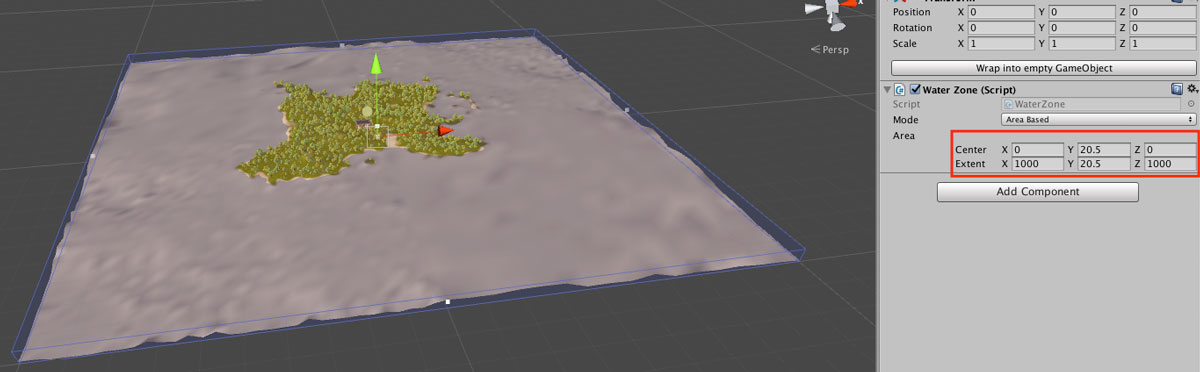
Here is where you make use of your notes. Start by taking the height (Y axis value) that your water plane was at, and divide by two. Enter that number in the Center section’s Y axis value. You can see it’s inside a red rectangle in the image above. In my example, the water was at 41, and subsequently half that is 20.5.
The Extent values are the distance from the center to the edge. Since it’s in the center, the extent is half the total width. Divide your terrain’s width number in half and enter that into the Extents X value. Enter the same number you used for the Center section’s Y axis value into the Extents Y axis value. Divide your terrain’s length number in half and enter that into the Extents Z value. Notice the blue cube in the image above, it should cover from zero to your water level and to the edges of your terrain.
Turn the water back on and check your work

Select your water and tick the box to turn it back on, and then then move your scene view around so you can get a better look. In the image above, I have adjusted so I can see the bottom as well as the water level. When I select the Water Zone in the Scene Hierarchy, it shows me the boundaries clearly.
That’s It!
Now you know how to create a water zone for SineSpace! Everything should be spot on and require no further adjustments, but depending on the specifics of your project you may want to do some fine-tuning.

Once your region is uploaded and processed, when a user’s camera goes into the space you defined in your Water Zone, they will see underwater effects in their SineSpace client. When they come up out of the water, they will also see streaks and droplets of water that dry off quickly. It’s a great effect, cheers to Adam and the SineSpace development team for their work in getting that going.

If you have questions or comments, please post in the comments below! If you want personal help or private training, please see this post. Good luck with your projects!
Latest Tutorials
- Using Adobe FireFly On Vision Pro
- What Is Physically Based Rendering?
- Copy And Paste On Vision Pro
- Allegro BTS
- How To Use The Extra Pattern System
